Advertisement

Monday, September 25, 2017

how to create folder with name -CON, NUL, COM1, COM2, COM3, LPT1, LPT2, LPT3,COM1 to COM9 and LPT1 to LPT9

you know VERY WELL that we can not create a folder named CON, NUL, COM1, COM2, COM3, LPT1, LPT2, LPT3,COM1 to COM9 and LPT1 to LPT9....
in any of the windows operating system.
try with this.
but here is the SOLLUTION............... .....
i found SOME method to create the folders with these reserved system names.
here is the solution to create the folder named con and other system variables.
METHOD1 -
CREATE A FOLDER GIVE NAME CON OR OTHER SYSTEM VARIABLES AND HOLD ALT+0160
YOUR FOLDER NAME CON IS READY

OR

METHOD 2
1) go to run dialog.
2) type cmd/command (command prompt gets opened)
3) go to root directory like C:\ or D:\ etc
4) type md\\.\\c:\\con ....(here is done)
5) check the folder on the respected drive.
try
& reply if not working.
NOTE - U CAN NOT DELETE CON FOLDER DIRECTLY . FOR DELETE FIRST EMPTY CAN FOLDER THEN  RUN FOLLOWINF COMMAND
rd \\.\\C:\\con
How to create folder with blank name

CREATE A FOLDER ( DONT TYPE NAME ) THEN HOLD ALT AND PRESS 0255 NOW RELEASE ALT KEY THEN PRESS ENTER NOW A FOLDER IS READY WITHOUT NAME

How to configure outlook 2007 for gmail email account


  • First of all enable Enable POP in your email account .


  • Open Outlook.


  • Click the Tools menu, and select Account Settings...


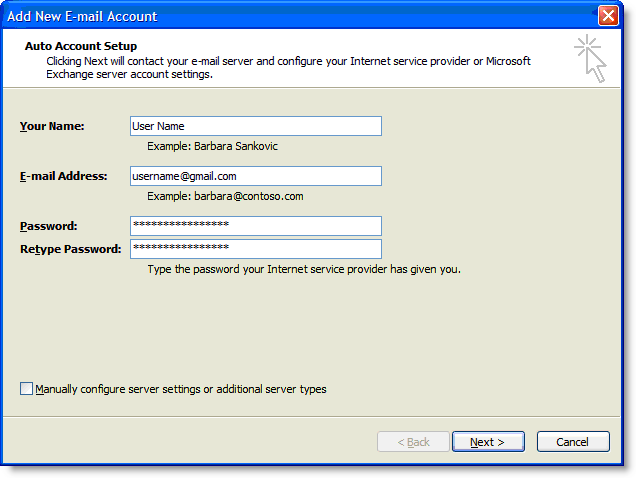
  • On the E-mail tab, click New...


  • If you are prompted to Choose E-mail Service , select Microsoft Exchange , POP3 , IMAP , or HTTP , and click Next .


  • Fill in all necessary fields to include the following information:

  • Your Name: Enter your name as you would like it to appear in the From: field of outgoing messages.
    Email Address: Enter your full Gmail email address (username@gmail.com ). Google Apps users, enter your full address in the format username@your_domain.com .
    Password: Enter your email password.
    Manually configure server settings or additional server types: Leave this option unchecked if you want to automatically configure Outlook 2007. If you want to manually configure Outlook 2007, check this box now. Google Apps users should configure manually as follows.
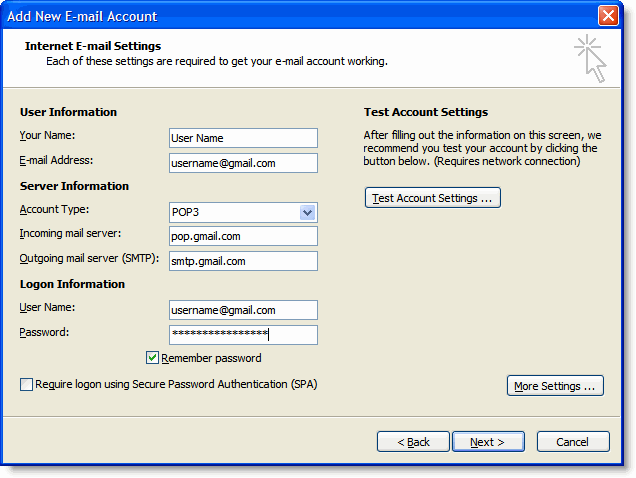
    Enter name, email address, and password

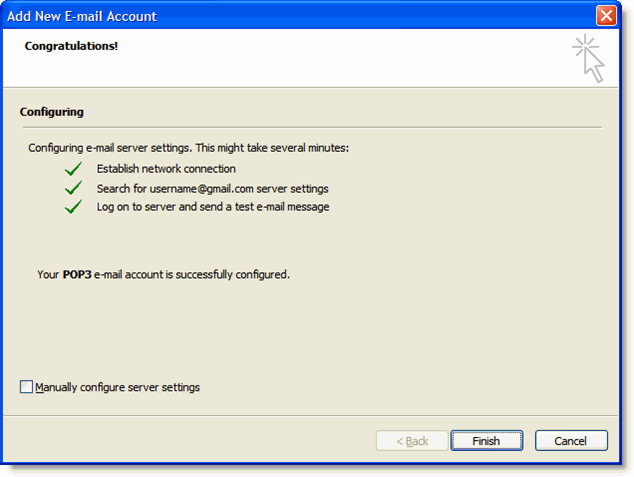
  • Click Next . If you are configuring Outlook 2007 automatically, you're done! Just click Finish .

  • Successful Configuration

  • If you are configuring Outlook 2007 manually, select Internet E-mail and click Next .


  • Verify your User Information , and enter the following additional information:

  • Server Information
    Account Type: POP3
    Incoming mail server: pop.gmail.com (Google Apps users, enter the server names provided, don't add your domain name in these steps)
    Outgoing mail server (SMTP): smtp.gmail.com
    Logon Information
    User Name: Enter your Gmail username (including @gmail.com ). Google Apps users, enter your full address in the format username@your_domain.com
    Password: Enter your email password.
    Require logon using Secure Password Authentication (SPA): Leave this option unchecked.
    Account Settings

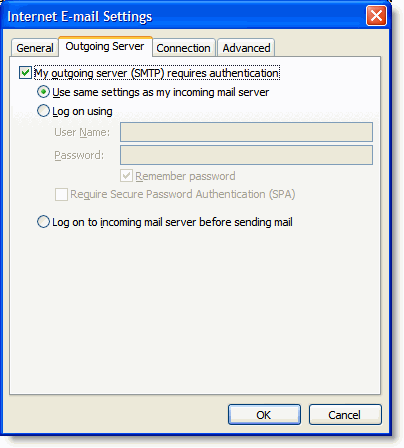
  • Click the More Settings... button, and select the Outgoing Server tab.


  • Check the box next to My outgoing server (SMTP) requires authentication and select Use same settings as my incoming mail server.

  • Outgoing Server Tab

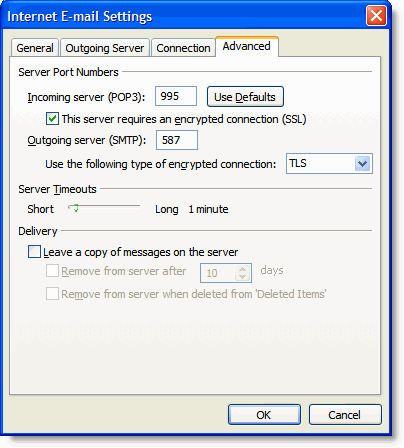
  • Click the Advanced tab , and check the box next to This server requires an encrypted connection (SSL) under Incoming Server (POP3) . Enter 995 in the 'Incoming Server' box.


  • In the Outgoing server (SMTP) box, enter 587 , and select TLS from the drop-down menu next to Use the following type of encrypted connection: . Advanced Tab


  • Click OK .


  • Click Test Account Settings... After receiving 'Congratulations! All tests completed successfully', click Close.


  • Click Next , and then click Finish.

    How to hide partitions throgh command prompt

    1) Go to Start - Run -type cmd then  type diskpart

    2) Then type "list volume"

    he result will look something like one as shown below-

      image

    3) Suppose you want to hide drive E then type "select volume 2"

    Then a message will appear in same window { Volume 2 is the selected volume}
    4) Now type "remove letter E"

    Now a message will come { Diskpart Removed the Drive letter }

    sometime it requires to reboot the computer.

    Diskpart will remove the letter.


    Windows XP is not having capabilty to identify the unknown volume.

    Your Data is now safe from unauthorised users.


    To access the content of hidden Drive repeat the process mentioned above. But in 4th step replace " remove" by "assign".

    It means type "assign letter E".


    How to make multibootable pendrive for window , Linux, Antivirus

    Hiii

    I am sharing a very handy tool for creating multibootable USB flash drive. you can make bootable USB for  window, linux , Hiren, antivirus or other in a single USB flash drive with the help of YUMI-Multiboot USB Creator. 
    Note-- you need ISO images of programs just like window , linux, hiren, antivrus, which ever you want to make bootable USB flash drive

    I am sharing a very handy tool for creating multibootable USB flash drive. you can make bootable USB for  window, linux , Hiren, antivirus or other in a single USB flash drive with the help of YUMI-Multiboot USB Creator. 
    Note-- you need ISO images of programs just like window , linux, hiren boot cd, antivrus, whatever  you want to make bootable USB flash drive

    How to restart, shutdown computer through command prompt

    go to command prompt

    for restart type

    shutdown -r -t 01

    for log off

    shutdown -l -t 01

    for shutdown

    shutdown -s -t 01

    Pen Drive shortcut problem


    Some time when you open pen drive a shortcut shown and existing files got disappear .
    Some Error also shown just like below

     "There Was A Problem Starting -SWDL.USDrv.

    Error loading_WWWYUMKZKKD.init and under it saying ` The specified module  could not be found.
    RUN.DLL error occurs 


    Solution :-

    go to the command prompt and type


    attrib -h -r -s F:*.* /s /d 


    Replace F with your drive letter (Pen drive)      

    now check your files in to pen drive and remove the shortcut.